The first step in performing a fit (or just comparing your measured data to IMD calculations) is to load your measured data into IMD. The internal variable names that IMD uses for measured data are X_m, Y_m, and SIGY_m, where X_m is the independent variable, Y_m is the dependent variable, and SIGY_m is the experimental uncertainty in Y_m. So the goal here is to get your data inside these variables. (SIGY_m is optional - if you don't define it, IMD will just set it to zero.)
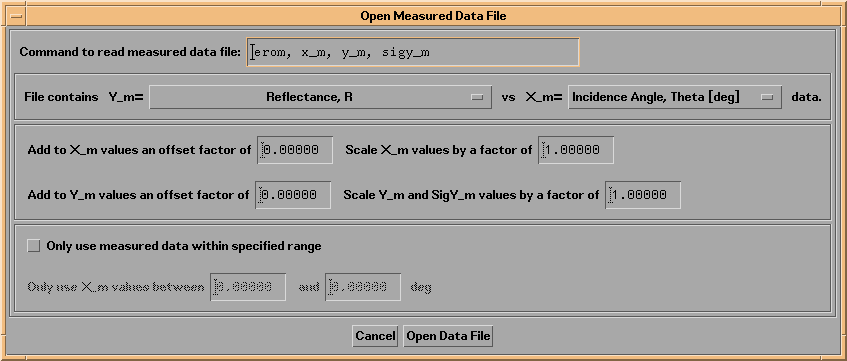
The easiet way to load your data into IMD is to use the File->Open Measured Data File... option from the main IMD widget menu bar. Figure 3.1.1 shows the widget that appears as a result:
Figure 3.1.1 IMD Open Measured Data File widget

To load in measured data, you must tell IMD what sort of data you have. In the Open Measured Data widget (Figure 3.1.1), you must select designations for X_m and Y_m from a list of available independent and dependent variables; the choices presented will be determined by the independent and dependent variables you have already selected in IMD.
For this example, I will illustrate how to read an ASCII file containing reflectance vs. incidence angle data measured for a Au film, 40 nm thick, at a wavelength of 400 nm.
Note: There are files located in the directory called examples.dir in the imd directory that you can load into IMD in order to follow along with this example. The measured data file, called 'Au_r_vs_th.MEASURED.dat', can be loaded into IMD using the File->Open Measured Data File... option, as described below. Use the File->Open... option to also read the file Au_r_vs_th.FIT.dat into IMD.
After specifying the relevant structure parameters (i.e., Au film, 40 nm thick), and the relevant independent and dependent variables (i.e., reflectance vs. incidence angle) in the main IMD widget, in the Open Measured Data widget, select Reflectance, R for Y_m, and Incidence Angle, Theta [deg] for X_m.
Note: it's important to set - before loading the data - the independent variable Units to correspond with what's actually in your file. For instance, if you're reading in data as a function of Normal incidence angle, make sure that the Angle units are set for Normal Incidence, and not Grazing Incidence. Likewise for wavelength/energy or length units.
You can change units to whatever you prefer after you load in the data, but IMD needs to know what units are actually in your data file ahead of time.
The final step is to tell IMD what IDL commands to use to actually read the file. Since the file I'm reading in this example is an ASCII file containing three columns of data - angle, reflectance, and uncertainty-in-reflectance - I can use the EROM command (see the documentation for the EROM command, located in the windt directory). The IDL command to read in the data is thus 'EROM, X_M, Y_M, SIGY_M'. This command goes in the field labelled Command to read measured data file: in the Open Measured Data File widget.
Note: If you have data that is in some other format, so that you cannot use the EROM command as described here, then you must enter the appropriate IDL commands in the Command to read measured data file: field of the Open Measured Data File widget. Consult Appendix B.3 for more details.
Note: You can add offsets and/or scale factors to your measured data in the Open Measured Data File widget (Figure 3.1.1.) This feature can be used, for example, to correct for systematic errors in your data, or to convert measured non-specular reflected X-ray intensity data, normalized to your incident beam intensity, i.e., I/I0, to the form (1/I0)dI/dOmega, which is the quantity that IMD computes. That is, you would divide your values of I/I0 by your detector solid angle, dOmega.
Note: You can limit the range of measured data by selecting the Only use measured data within specified range button, and by entering the X_m values that define the range of interest.
Once you have finished with the Open Measured Data File widget, press Open Data File to actually read the file. In this example, the EROM command will now ask you to select a file to open. If you wish to follow along with this example, then select the file called Au_r_vs_th.MEASURED.dat in the examples.dir directory.
After the data is read in successfully, the MEASURED DATA area of the main IMD widget will indicate what data has been loaded. In this example, the MEASURED DATA widget looks like this:
Figure 3.1.2: MEASURED DATA area of the main IMD widget after reading in data.
